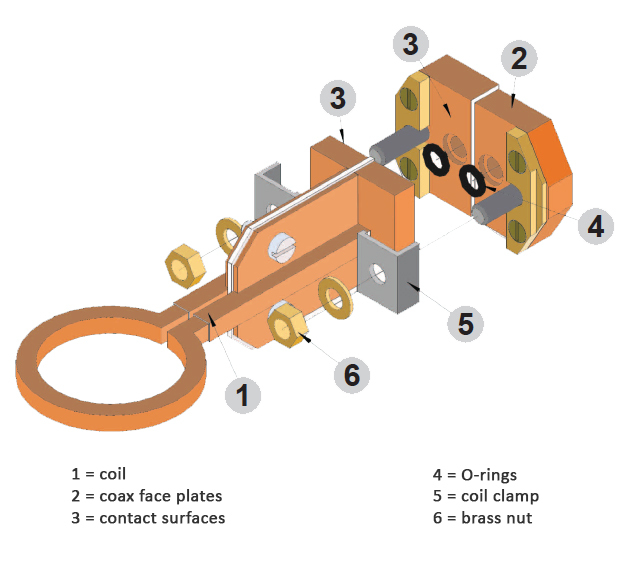
Mounting induction heating coils improperly often causes problems that eventually require service calls. According to eldec Engineering Services Manager Mark Kozlowski, installing coils correctly can prevent costly down time and repairs.

When mounting an induction heating coil keep the following steps and tips in mind:
- Turn off cooling water.
- Turn off the main switch.
- Place a bucket under the inductor to capture leaking cooling water.
- Loosen the nuts (6) on the connector jaws (2) in order to release the thrust pieces (5).
- Pull the inductor (1) towards the top and remove.
- Clean both contact surfaces (3) with a Scotch-BriteTM pad.
- Check both O-rings (4) for damage and replace them if necessary.
- Check both contact surfaces (3) for damage.
- Insert the new coil. Make sure the coil and the coaxial transformers have a tight fit.
 Caution! Be sure to use only brass nuts and washers!
- Use the following torques when tightening the nuts:
- M6 nuts = 9 Nm.
- M8 nuts = 13 Nm.
- M10 nuts = 19 Nm.
Please also be aware of the following:
- Over-tightening can lead to thread stripping on the nuts (6).
- Under-tightening can lead to:
- Arcing between the coil and coax contact surfaces (3), which can lead to surface pitting.
- Current running through the stud to the clamp, which can melt the stud.
If you have additional questions regarding mounting induction heating coils, feel free to contact eldec’s technical hotline at 1-248-364-4750.
Download a printer-friendly version of these handy tips.
Need more help? Call us.
